Designing an intentional, functional bedroom that balances personal identity with daily utility is an essential focus for parents and teenagers creating a personalized living space. As adolescents transition through middle school, high school, and early adulthood, their personal environments must evolve beyond childhood playrooms into versatile spaces suited for focused academic study, creative hobbies, social relaxation, and restorative sleep. Modern teen bedroom design relies on zoned layouts, multi-functional modular furniture, smart ambient lighting, and customizable display systems that reflect evolving personal aesthetics without requiring continuous structural renovations. This comprehensive interior styling guide presents ten distinct teen room design concepts spanning vertical loft workstations, cozy reading nooks, modern LED acoustic feature walls, organized gaming hubs, and bohemian botanical corners. Readers will discover the architectural principles of space planning, explore how color psychology impacts focus and relaxation, and master actionable techniques for assembling durable, space-saving layouts. Exploring these step by step design formulas provides the practical knowledge needed to choose suitable textiles, modular shelving, and ergonomic furniture, creating an elevated personal retreat that supports daily productivity and relaxed independence.
Why This Idea Is Trending or Useful
Teen bedroom transformations consistently dominate trending ideas across digital lifestyle boards and home decor channels because they resolve the ongoing spatial challenges of compact modern homes. Traditional bedroom setups with static furniture often create cramped floor plans that struggle to accommodate school textbooks, electronic gaming gear, wardrobe collections, and hobby equipment simultaneously. In contrast, well-executed modern teen rooms use vertical storage, modular furniture, and intentional zoning to maximize usable square footage while preserving open floor space. The design relevance focuses on adaptability; clean minimalist style foundations paired with customizable accent elements allow the room aesthetic to mature seamlessly alongside the teenager. From a DIY appeal standpoint, assembling these creative ideas serves as an accessible, beginner friendly creative project that families can execute together over a single weekend using affordable materials. Teenagers gain functional independence by participating in the organization and planning of their personal space. By merging ergonomic productivity with customizable visual identity, modern teen room design provides a practical, inspiring framework for personal growth and comfortable daily living.
Materials and Preparation
Executing a durable, aesthetically cohesive teen bedroom transformation requires gathering reliable hardware, adaptable storage furniture, multi-layered lighting fixtures, and surface preparation supplies before assembly begins. Essential hardware components include heavy-duty wall anchors, metal shelf brackets, cordless drills, laser levels, cable management raceways, and painter tape. Foundational furniture and decor materials encompass solid wood or powder-coated steel bed frames, high-density modular cube shelving, ergonomic desk chairs, acoustic wood slat wall panels, dimmable LED strip lighting, and breathable natural cotton bedding. Preparation begins with a thorough room declutter: sorting outgrown childhood items, donating unused apparel, measuring exact wall dimensions, and identifying electrical outlet positions to map cord routing. Planning considerations require evaluating primary daily activities, such as study requirements, digital gaming setups, instrument storage, and vanity needs, ensuring that designated zones do not interfere with natural walking clearances. Establishing these spatial preparations and gathering quality materials beforehand guarantees an organized workspace, smooth installation, and long-lasting structural stability for the completed room.
Modular Loft Bed with Integrated Study Station
Step-by-Step Guide
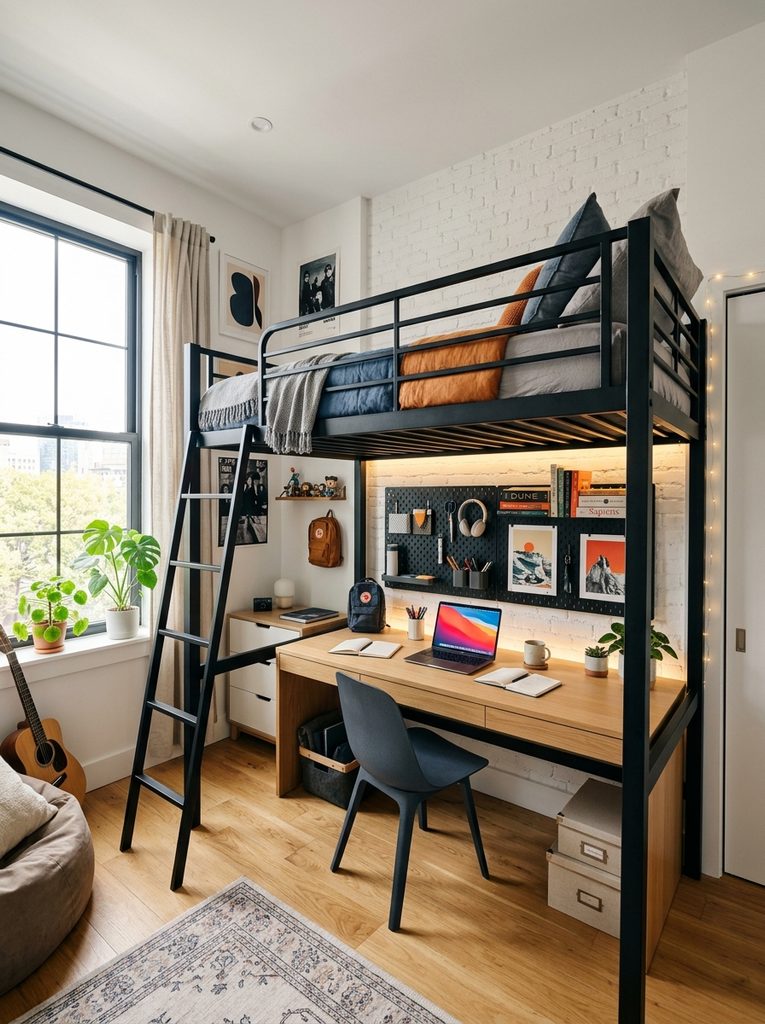
The modular loft bed with an integrated lower study station optimizes vertical space in compact bedrooms by stacking the sleeping area directly above an expansive academic workspace. Constructed from sturdy powder-coated steel or solid pine, the elevated platform lifts a twin or full mattress five to six feet off the floor, freeing up prime floor area underneath. The lower alcove accommodates a full-length study desk equipped with integrated power strips, open book shelving, and magnetic task boards. This vertical zoning distinctly separates study activities from sleep routines, helping teenagers focus on homework without the distraction of resting on the bed during daylight hours.
       +---------------------------------------------+
       |   Elevated Sleep Platform & Safety Rails    |
       +---------------------------------------------+
                              |
       +---------------------------------------------+
       |   Vertical Ladder / Storage Staircase Unit  |
       +---------------------------------------------+
                              |
       +---------------------------------------------+
       |   Integrated Study Desk & Power Management  |
       +---------------------------------------------+
To construct and style this modular loft station, begin by clearing the designated corner of the room and anchoring the main loft support posts into structural wall studs using heavy-duty lag bolts. Assemble the upper safety guardrails and mattress support slats, ensuring all hardware connections are tightened securely. Install a smooth desktop surface across the lower frame, mounting a vertical pegboard or magnetic memo strip along the back wall to hold stationery cups, headphones, and calendar pads. Place an ergonomic, height-adjustable task chair beneath the desk and attach a clip-on LED task lamp to the underside of the bed frame. Complete the setup by styling the upper bunk with breathable linen bedding, a clip-on bedside shelf, and a warm reading light.
Cozy Reading Canopy and Floor Cushion Corner
Execution Process
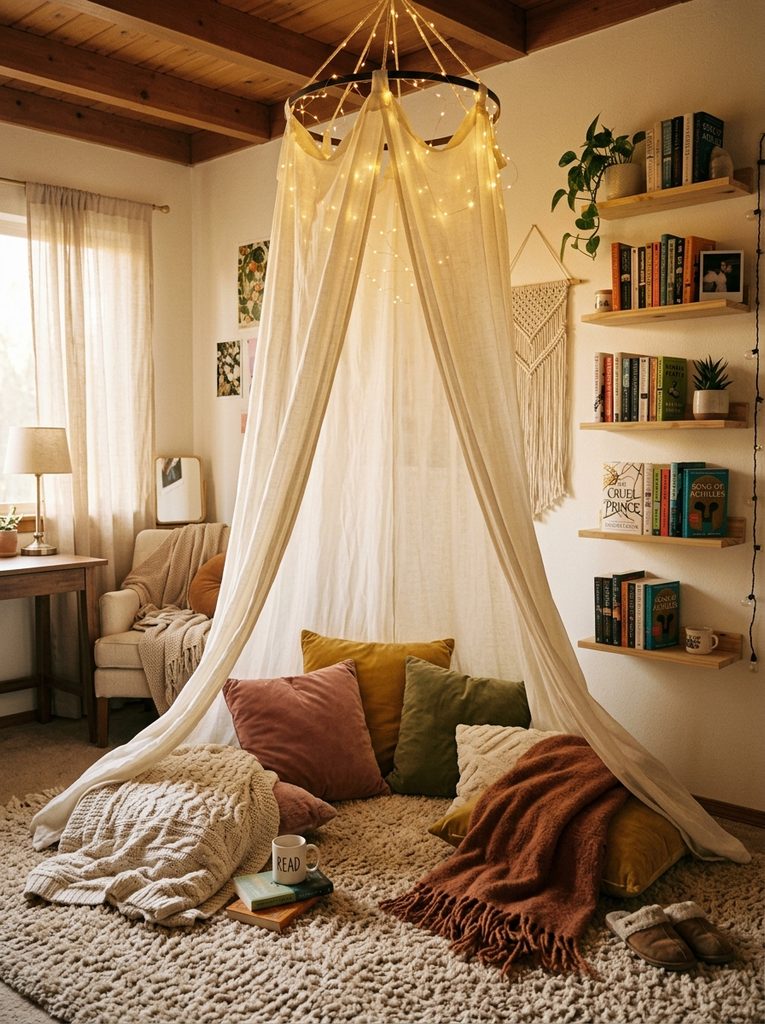
The cozy reading canopy and floor cushion corner converts an underutilized bedroom alcove into an inviting lounge zone dedicated to reading, listening to music, and quiet relaxation. Suspended from the ceiling, a flowing fabric canopy crafted from semi-sheer linen or lightweight cotton drapes downward, defining a semi-private sanctuary within the larger room. Beneath the canopy, a layered arrangement of oversized velvet floor cushions, plush faux-fur rugs, and textured throw pillows creates comfortable, casual seating that eliminates the need for bulky traditional armchairs. This tactile, relaxed arrangement introduces softness into modern bedrooms, offering teenagers an inviting space to unwind away from digital screens.
To create this reading corner, locate a ceiling joist using an electronic stud finder and screw a heavy-duty swag hook securely into the ceiling anchor point. Thread the hanging loop of a circular hoop canopy onto the hook, arranging the flowing side fabric panels so they drape symmetrically down to the floor. Lay a high-pile faux-fur rug across the corner floor, topping it with a dense high-density foam floor mattress or a cluster of oversized floor cushions measuring at least twenty-four inches square. Arrange textured throw pillows and a knit blanket inside the canopy perimeter, weaving a strand of battery-operated micro fairy lights through the interior hoop ribs for soft ambient illumination. Mount a floating book ledge on the adjacent wall to hold favorite novels within easy arm reach.
                 +---------------------------------+
                 |  Ceiling-Mounted Fabric Canopy  |
                 +---------------------------------+
                                  |
            +-------------------------------------------+
            |  Layered High-Pile Rug & Velvet Cushions  |
            +-------------------------------------------+
                                  |
            +-------------------------------------------+
            |  Floating Wooden Ledges for Book Display  |
            +-------------------------------------------+
LED Neon Backlit Acoustic Slat Accent Wall
How to Create
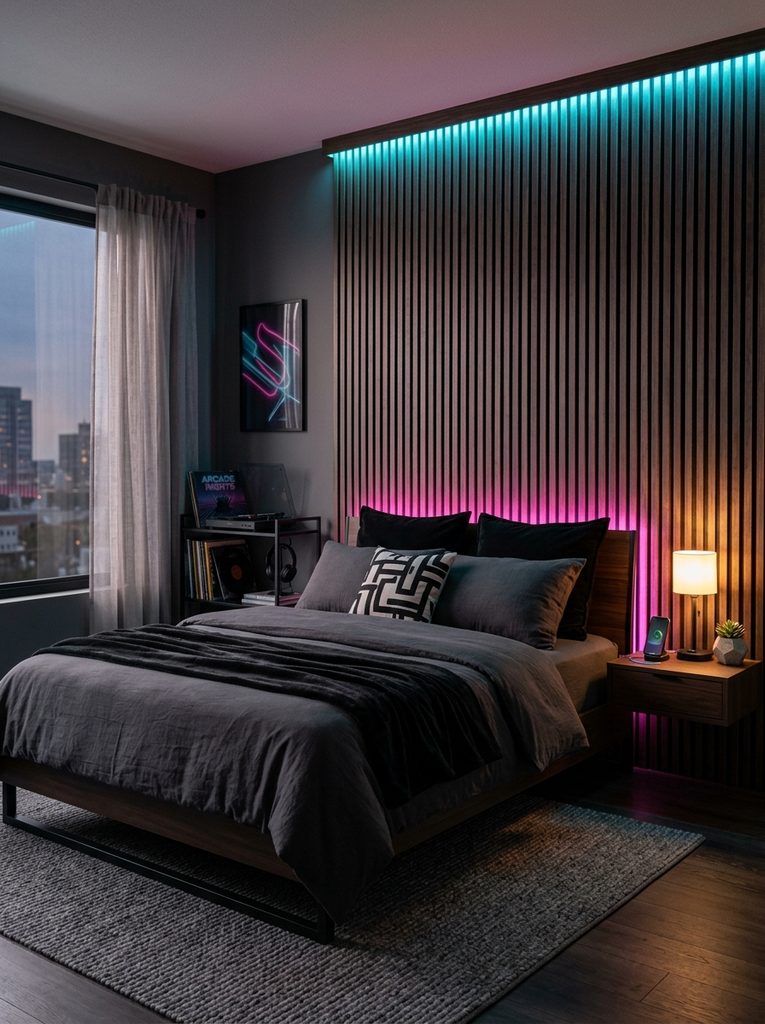
The LED neon backlit acoustic slat accent wall combines contemporary architectural texture with vibrant ambient lighting to establish a dramatic focal wall behind the bed or desk. Vertical acoustic wood-veneer slats mounted on black sound-absorbing felt backing dampen room echo and provide architectural depth. Recessed behind or running along the slat perimeter, programmable smart LED neon rope lights cast dynamic, customizable ambient color washes across the natural wood grain. This modern design provides high visual impact, allowing teenagers to personalize their room ambiance from vibrant neon tones during gaming sessions to soothing warm white lighting during evening study.
| Installation Phase | Material Requirement | Structural Function |
|---|---|---|
| Acoustic Slat Base | Wood-Veneer Felt-Backed Panels | Dampens audio reverberation and adds vertical texture |
| Fastening System | Black Drywall Screws & Construction Adhesive | Secures panels flush against structural drywall |
| Ambient Lighting | Smart Addressable LED Neon Silicone Tube | Casts customizable diffused light washes across walls |
| Cable Raceway | Paintable Adhesive Cord Concealer | Conceals power cords and transformers cleanly |
Begin creating this modern feature wall by measuring the wall surface and cutting acoustic wood slat panels to size using a fine-tooth circular saw. Apply construction adhesive in a serpentine pattern across the back of each panel, pressing it firmly against the wall and driving black drywall screws through the black felt backing directly into wall studs. Mount flexible silicone LED neon rope channels along the top and bottom perimeters or between panel joints, securing the tracks with clear mounting clips. Route the lighting power cords through a paintable surface raceway down to the nearest floor outlet. Pair the smart LED controller with a mobile smartphone app, programming automated schedules to transition lighting colors between study, leisure, and sleep modes.
Pegboard Display and Gaming Command Center
Setup Method
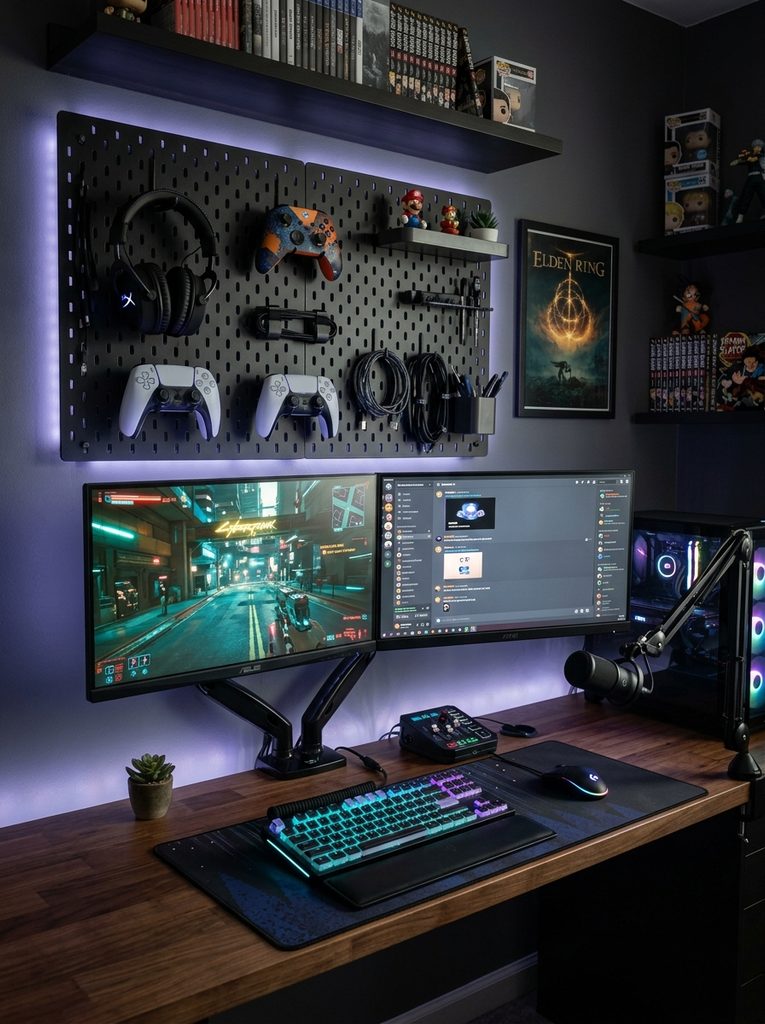
The pegboard display and gaming command center organizes electronic gaming peripherals, audio headsets, and charging cables into an efficient, ergonomic entertainment hub. Centered around a wide, cable-managed computer desk, this setup uses large wall-mounted steel or wooden pegboard panels to display controllers, keyboards, and handheld consoles vertically. Storing gaming gear on specialized pegboard brackets keeps the desktop surface entirely clear for large mousepads and dual-monitor arms. This structured organization protects expensive electronic hardware from accidental spills while turning colorful gaming gear into an intentional decorative feature.
       +---------------------------------------------+
       |   Upper Pegboard: Audio Headsets & Cables   |
       +---------------------------------------------+
                              |
       +---------------------------------------------+
       |   Mid Zone: Dual Monitor Arm & Gaming Rig   |
       +---------------------------------------------+
                              |
       +---------------------------------------------+
       |   Under-Desk Cable Management Raceway Tray  |
       +---------------------------------------------+
To set up this gaming hub, mount a heavy-duty steel pegboard panel directly above your desk using wall anchors, leaving a three-quarter-inch standoff clearance behind the board for hook attachment. Install rubber-coated double hooks to hold gaming controllers, wide brackets for over-ear headphones, and shallow wire baskets for charging cables and USB drives. Mount an articulating dual-monitor arm to the back edge of the desk, elevating screens to eye level to promote healthy neck posture. Install a horizontal wire basket raceway beneath the rear of the desktop to house surge protectors and excess power cords. Complete the setup by adding an oversized desk mat, an ergonomic gaming chair, and subtle under-desk LED light bars for ambient glow.
Earthy Bohemian Rattan and Botanical Plant Sanctuary
Step-by-Step Guide
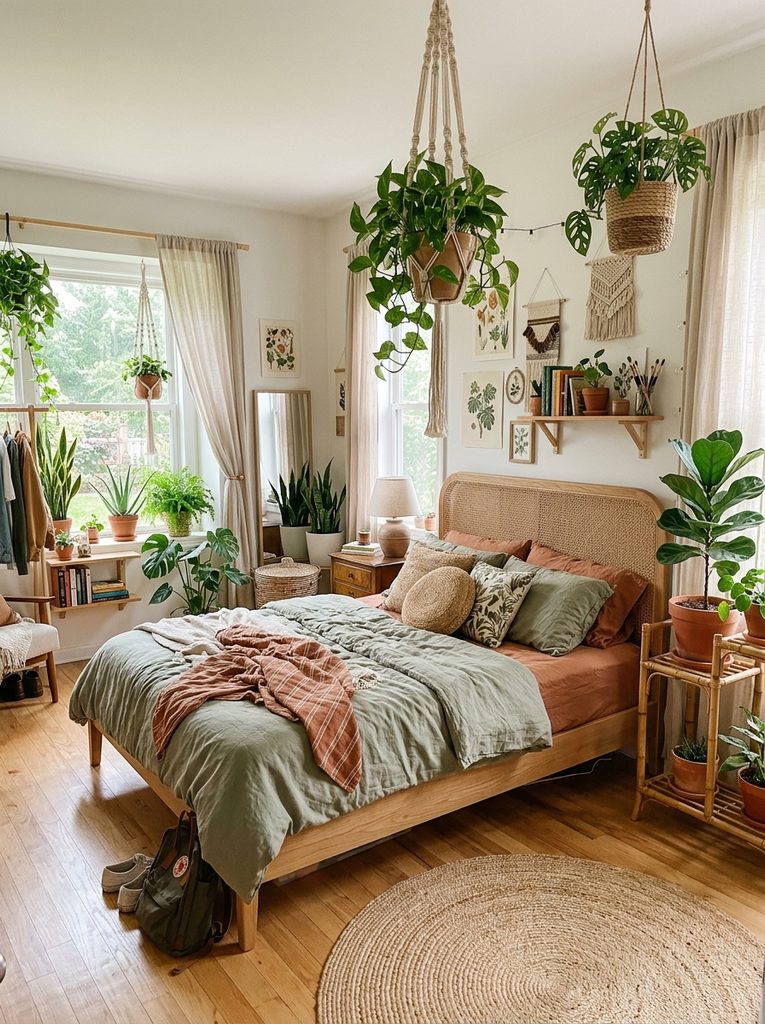
The earthy bohemian rattan and botanical plant sanctuary embraces organic textures, warm earth tones, and living houseplants to create a calming, nature-inspired bedroom retreat. This aesthetic combines woven rattan headboards, macrame wall hangings, natural jute floor rugs, and terracotta planters filled with low-maintenance indoor greenery like pothos, snake plants, and monsteras. The biophilic design elements improve indoor air quality while reducing daily stress, providing an earthy, grounded sanctuary that contrasts with digital screens and academic pressures. The natural wood, linen, and clay textures blend together to produce a timeless, visually soothing environment.
To assemble this botanical bedroom, position a woven rattan or light oak bed frame against a warm neutral wall painted in soft terracotta, sage green, or warm cream. Layer the bed with an ivory linen duvet cover, a waffle-weave mustard throw blanket, and fringed macrame accent pillows. Suspend trailing ivy or satin pothos plants from ceiling macrame hangers near the window, ensuring they receive bright, indirect sunlight. Arrange potted snake plants and ZZ plants in varied terracotta pots on a tiered bamboo plant stand. Complete the styling by laying a circular woven jute rug on the floor and mounting a decorative rattan mirror above the dresser to reflect natural daylight across the room.
                 +---------------------------------+
                 |  Ceiling Macrame Plant Hangers  |
                 +---------------------------------+
                                  |
            +-------------------------------------------+
            |  Woven Rattan Headboard & Linen Bedding   |
            +-------------------------------------------+
                                  |
            +-------------------------------------------+
            |  Natural Jute Rug & Terracotta Planters   |
            +-------------------------------------------+
Gallery Wall Matrix with Floating Picture Ledges
Execution Process
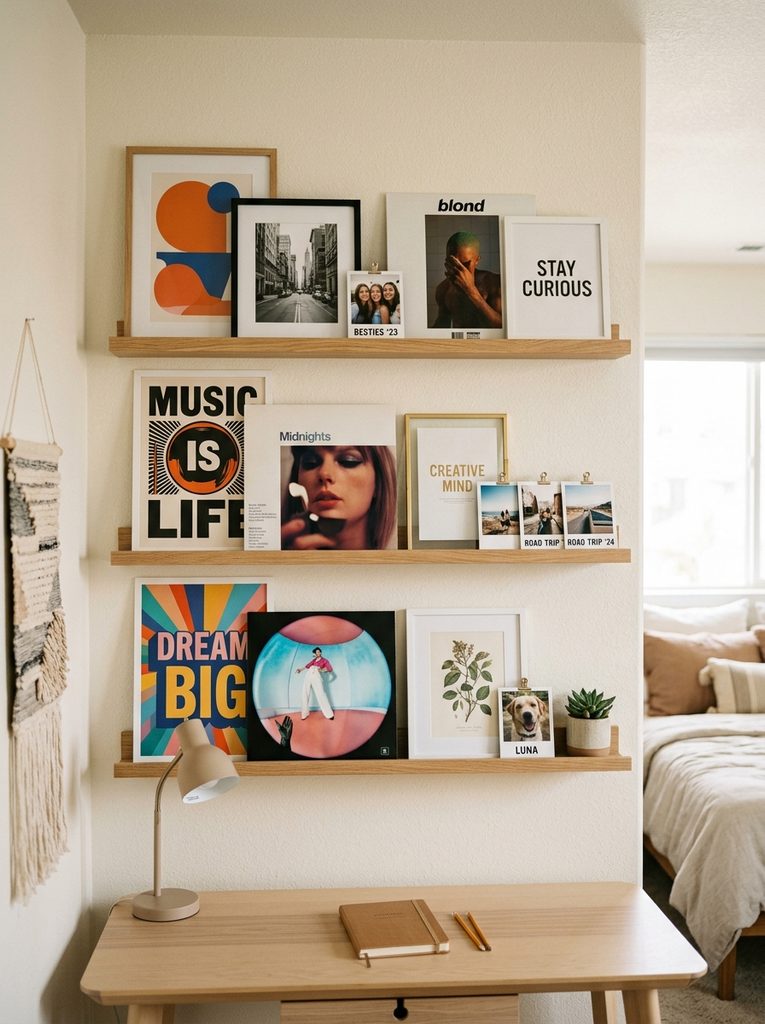
The gallery wall matrix with floating picture ledges establishes an adaptable, dynamic art display where teenagers can showcase personal photography, concert tickets, album covers, and art prints without damaging walls. Unlike traditional static picture frames nailed permanently into drywall, shallow floating ledges allow prints and framed photos to be overlapped, rearranged, and swapped out effortlessly as interests evolve. This rotating gallery concept encourages creative self-expression, providing an organized visual focal point that celebrates friendships, travel memories, and personal milestones within a clean, modern framework.
To install this rotating gallery wall, select a cleared wall space and use a long spirit level to mark three horizontal lines spaced twelve to fourteen inches apart vertically. Mount slim wooden or white composite picture ledges along the marked lines, securing them into wall studs with countersunk screws. Fill a collection of matching thin gallery frames—in matte black, white, or natural oak—with personal photographs, graphic typography prints, and favorite album art. Layer the frames along the ledges, placing larger frames toward the back and overlapping smaller frames in front to create multi-dimensional visual depth. Add small decorative accents, such as miniature brass figurines, polaroid photo clips, or small trailing succulent pots, to finish the display.
Space-Saving Built-In Window Bench with Storage Cubbies
How to Create
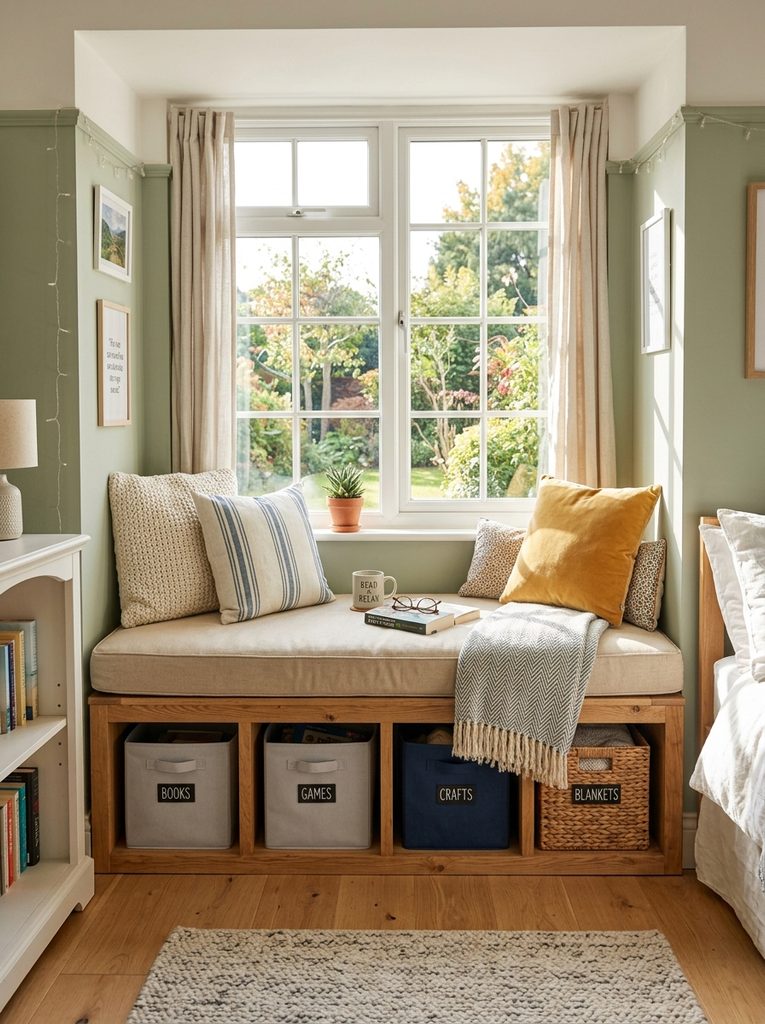
The space-saving built-in window bench with storage cubbies transforms unused space beneath a bedroom window into a multi-functional reading nook and storage chest. Constructed by securing modular horizontal cube organizers beneath the windowsill and topping them with a tailored foam bench cushion, this installation provides seating and organized hidden storage. The lower cubbies hold fabric storage bins, shoe collections, extra bedding, and seasonal sports equipment, keeping floor clutter out of sight. Positioned beside the window, this nook benefits from natural daylight, making it a favorite spot for daydreaming, studying, or socializing with visiting friends.
| Construction Component | Material Selection | Practical Function |
|---|---|---|
| Bench Base | Reinforced Horizontal Cube Shelf | Provides durable seating foundation and open storage |
| Seating Pad | 3-Inch High-Density Upholstery Foam | Delivers comfortable, resilient support for long sitting |
| Cushion Cover | Heavyweight Canvas or Corduroy Fabric | Resists daily wear and simplifies spot-cleaning |
| Storage Bins | Structured Canvas Fabric Bins with Handles | Conceals loose gear, shoes, and seasonal items neatly |
Begin creating this window seat by assembling a sturdy, horizontal two-by-four cube storage unit and positioning it flush beneath the window trim, securing it to wall studs with corner angle brackets. Measure the top surface of the bench and cut a three-inch-thick high-density upholstery foam pad to matching dimensions using an electric carving knife. Wrap the foam pad in polyester batting, encasing it in a tailored zippered canvas or corduroy cushion cover. Secure the padded cushion to the top bench surface using adhesive hook-and-loop fastening strips. Slide structured canvas storage bins into the lower open cubbies, labeling each bin for organized storage of extra blankets, winter accessories, or gaming accessories.
       +---------------------------------------------+
       |   Sunlit Bedroom Window Trim Alignment     |
       +---------------------------------------------+
                              |
       +---------------------------------------------+
       |   3-Inch High-Density Foam Upholstered Bench|
       +---------------------------------------------+
                              |
       +---------------------------------------------+
       |   Integrated Storage Cubbies & Canvas Bins  |
       +---------------------------------------------+
Minimalist Scandinavian Platform Bed with Hidden Drawers
Setup Method
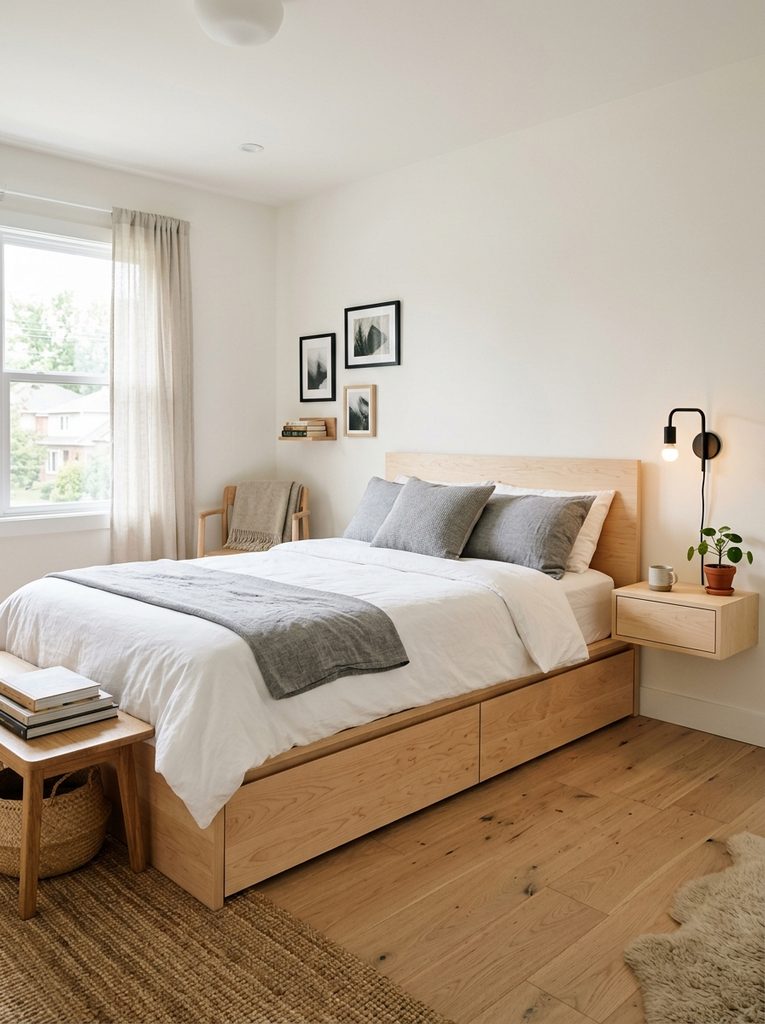
The minimalist Scandinavian platform bed with hidden under-bed storage drawers provides a sleek, low-profile sleeping solution that maximizes storage capacity without visual bulk. Built from light birch, ash, or blonde oak, the clean platform frame eliminates the need for bulky box springs, keeping the visual height of the room low and airy. Seamless pull-out drawers integrated directly into the base glide smoothly on concealed rollers, offering storage for folded clothing, extra linens, and bulky winter apparel. This minimalist design emphasizes clean lines, functional simplicity, and serene negative space, establishing an orderly, restful bedroom environment.
To set up this platform storage bed, clear the center of the bedroom and assemble the solid wood platform base according to manufacturer specifications, checking that the internal drawer glide tracks are aligned and level. Assemble the deep storage drawers, attaching smooth-rolling nylon casters or soft-close undermount slides before sliding them into the base frame. Place a breathable memory foam or hybrid mattress directly onto the supportive wooden slats. Dress the bed in monochromatic neutral textiles, such as a crisp white cotton duvet, heather-gray linen sheets, and a chunky knit throw blanket draped across the foot. Place a slim, floating nightstand on each side of the bed, mounting minimalist wall sconces above to keep tabletop surfaces clear.
Personalized Vanity Station with Hollywood Bulb Mirror
Step-by-Step Guide
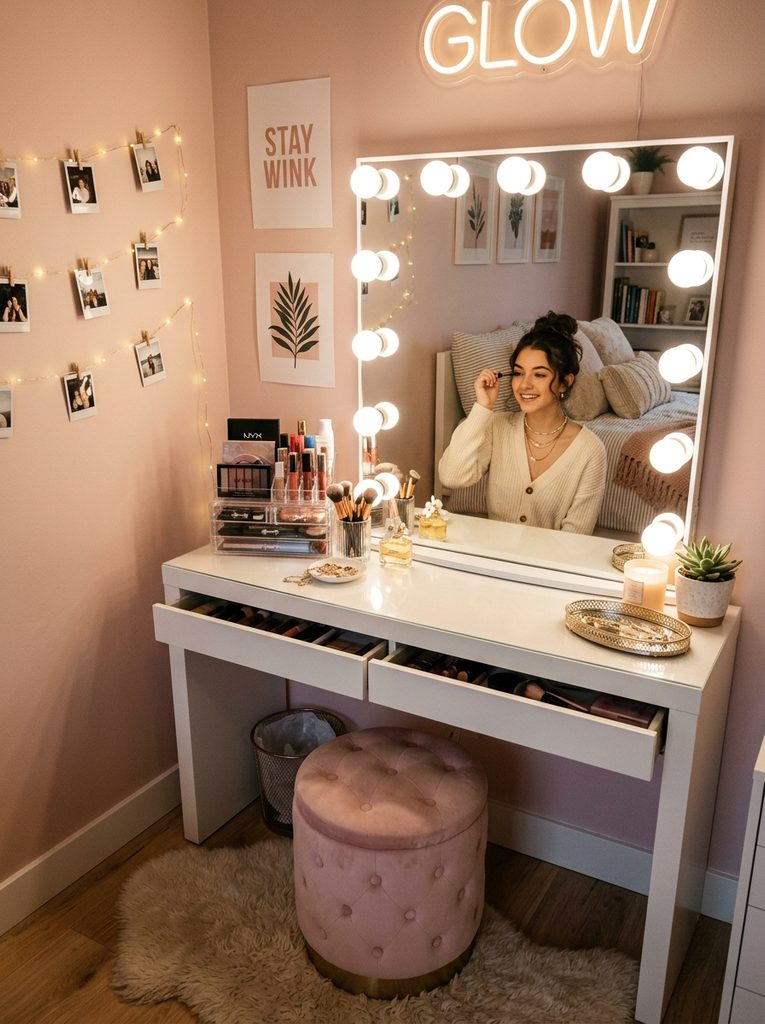
The personalized vanity station with a Hollywood bulb mirror creates a dedicated grooming, skincare, and creative cosmetics area that keeps bathroom countertops clear. Featuring a sleek white console table with slim pull-out drawers paired with a large vanity mirror framed by dimmable daylight-balanced LED globes, this station provides optimal illumination for daily skincare and styling routines. Clear acrylic drawer inserts and rotating desktop organizers keep makeup brushes, skincare serums, hair accessories, and jewelry organized and visible. This glamorous, practical setup adds a touch of modern luxury to the bedroom, giving teenagers a dedicated space to prepare for the day.
To construct this vanity station, position a slim white dressing table against an open wall near a power outlet, anchoring the table to wall studs with anti-tip safety brackets. Mount a large rectangular vanity mirror featuring integrated dimmable LED Hollywood bulbs directly above the table at seated eye level, connecting the power transformer to the wall outlet. Line the table drawers with non-slip silicone liners, inserting clear acrylic organizer trays to separate cosmetics, hair clips, and brushes by category. Place a comfortable velvet upholstered ottoman or swivel stool beneath the table. Complete the setup with a small tabletop magnifying mirror, a rotating acrylic skincare tower, and a sleek power strip for hair styling tools.
                 +---------------------------------+
                 |  Hollywood Dimmable LED Mirror  |
                 +---------------------------------+
                                  |
            +-------------------------------------------+
            |  Slim Console Table with Acrylic Inserts  |
            +-------------------------------------------+
                                  |
            +-------------------------------------------+
            |  Velvet Swivel Stool & Hair Tool Power    |
            +-------------------------------------------+
Color-Blocked Architectural Geometric Painted Accent Zone
Execution Process
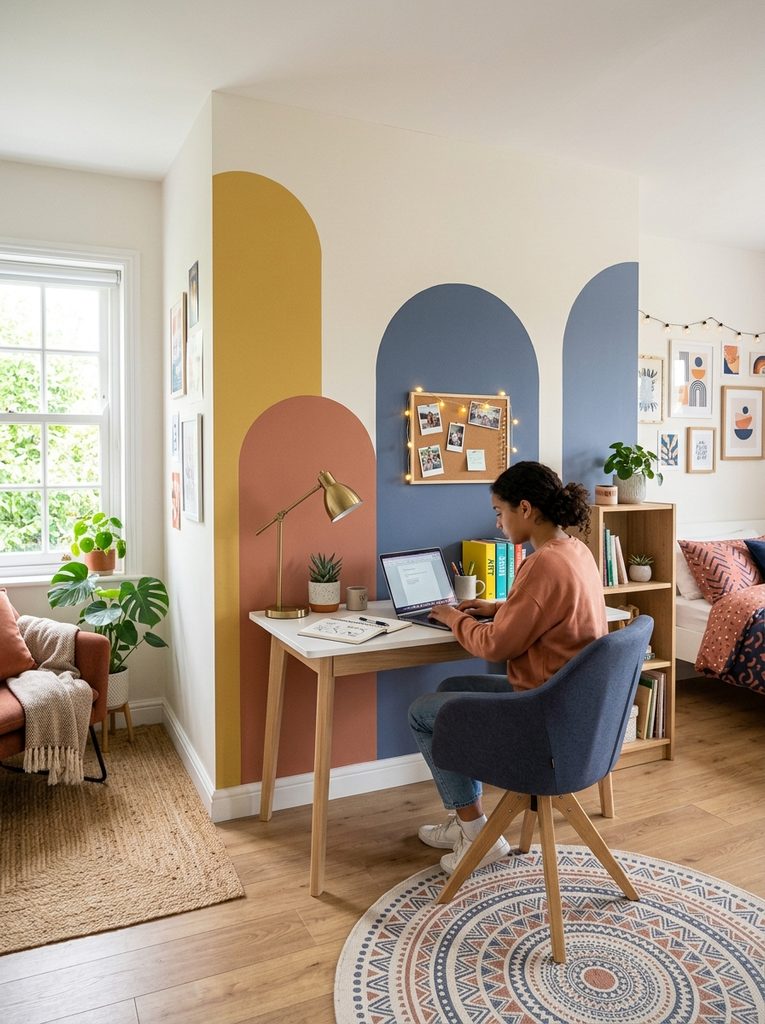
The color-blocked architectural geometric painted accent zone uses bold, contrasting paint colors to define specific functional zones without requiring physical room dividers. By applying sharp diagonal lines, painted arched headboards, or rectangular color blocks across plain drywall, this technique frames specific furniture arrangements like study desks, reading chairs, or beds. Combining contemporary colors—such as muted terracotta, mustard yellow, deep forest green, and dusty navy—creates an energetic, artistic backdrop that transforms plain walls into custom architectural features. This budget-friendly painting technique delivers high visual impact, allowing teenagers to personalize their room with vibrant color and graphic creativity.
To execute this geometric paint project, sketch your desired geometric layout—such as a large arch behind the bed or a bold diagonal slice behind the study desk—on graph paper to plan proportions. Transfer the design onto the wall using a pencil, a long ruler, and a string attached to a central pushpin to trace clean arched curves. Apply high-adhesion painter tape along straight pencil boundaries, pressing the tape edges down firmly with a putty knife to prevent paint bleed. Paint the interior of the geometric shape with two coats of high-pigment matte or eggshell latex paint, allowing the first coat to dry completely before applying the second. Carefully remove the painter tape while the second coat is slightly tacky to reveal crisp lines, letting the paint cure for twenty-four hours before pushing furniture into place.
Common Beginner Mistakes and How to Avoid Them
When executing a teen bedroom redesign, decorators and families frequently make several common spatial and functional errors that can compromise comfort, organization, and visual longevity. A widespread mistake is selecting overly childish, fixed theme decor—such as character bedding or rigid themed wall murals—that the teenager quickly outgrows within a year. To prevent this, build the room around neutral, high-quality furniture foundations and incorporate personal interests through easily swappable art prints, textiles, and decorative accessories. Another critical error is neglecting cable management for electronics, leaving tangled cords exposed around desks and nightstands, which creates visual clutter and potential safety hazards.
+-------------------------------------------------------------+
|              Common Error: Fixed Theme Childish Decor       |
|        (Quickly outgrown, requiring costly full redesigns)  |
+-------------------------------------------------------------+
                               |
                               v
+-------------------------------------------------------------+
|       Solution: Neutral Furniture + Swappable Accents       |
|         (Adapts seamlessly as teen interests and styles grow)|
+-------------------------------------------------------------+
Beginners also frequently overlook adequate task lighting, relying entirely on a single harsh overhead ceiling fixture that strains the eyes during late-night studying. Always install layered lighting schemes combining ambient overhead lights, focused desk task lamps, and soft accent fairy lights or LED strips. Neglecting hidden storage is another common issue; open shelving packed with miscellaneous items quickly looks messy without matching bins or closed drawer units to conceal loose gear. Finally, avoid purchasing oversized furniture that blocks doorways, window light, or natural walking paths—always map out furniture footprints with painter tape on the floor before purchasing.
Practical Tips for Better Results
Achieving a polished, designer-grade teen bedroom relies on thoughtful spatial zoning, ergonomic furniture choices, and multi-layered lighting systems. Always apply the three-layer lighting strategy: install warm ambient ceiling fixtures for overall illumination, adjustable LED task lamps at desks and vanities for focused activities, and dimmable accent lighting—such as LED neon signs or under-bed strips—to create a cozy evening atmosphere. When purchasing study desks and chairs, prioritize ergonomic adjustability to support proper posture during long study sessions, ensuring desk heights align comfortably with forearm resting angles.
+-------------------------------------------------------------+
|          Implement Three-Layer Lighting Architecture        |
|             (Ambient Ceiling + Task Desk + Accent LEDs)     |
+-------------------------------------------------------------+
                               |
                               v
+-------------------------------------------------------------+
|         Use Closed Bins to Conceal Visual Desk Clutter       |
|           (Maintains clean surfaces and promotes focus)     |
+-------------------------------------------------------------+
                               |
                               v
+-------------------------------------------------------------+
|         Anchor Heavy Tall Furniture Securely to Wall Studs  |
|            (Prevents tipping and ensures long-term safety)  |
+-------------------------------------------------------------+
To maintain an uncluttered environment over time, establish dedicated drop zones near the doorway for backpacks, athletic gear, and jackets using sturdy wall hooks. Select durable, stain-resistant fabrics like washable linen, treated canvas, and textured microfiber for bedding and upholstery, simplifying regular maintenance and spot cleaning. When installing wall-mounted shelves, pegboards, and mirrors, always use a laser level and anchor hardware directly into wooden wall studs to support heavier book collections and electronic gear safely.
Styling, Presentation, or Organization Ideas
Integrating diverse functional zones into a cohesive, aesthetically pleasing bedroom requires balancing practical storage with harmonious color palettes and balanced textures. When organizing open shelving units, follow the visual rule of thirds: dedicate one-third of the shelf space to functional book storage, one-third to decorative accents like framed photos and potted plants, and one-third to closed storage baskets that conceal smaller miscellaneous items. This balanced staging prevents storage units from appearing overwhelming while maintaining an orderly aesthetic.
+-------------------------------------------------------------------+
|                  TEEN BEDROOM SPATIAL ZONING MAP                  |
+-------------------------------------------------------------------+
|   [ Rest & Sleep Zone ] [ Academic Study Hub ]  [ Lounge & Hobby ]|
|   - Platform Bed        - Cable-Managed Desk    - Reading Canopy  |
|   - Floating Nightstand - Ergonomic Task Chair  - Floor Cushions  |
|   - Soft Ambient Sconce - Pegboard Organizer    - Acoustic Slat   |
|                                                                   |
|   [================= Hidden Storage Perimeter ====================]|
|   - Under-bed drawers, window seat cubbies, and wardrobe closets  |
+-------------------------------------------------------------------+
Enhance the presentation of the room by coordinating metal finishes and textile textures across the entire space. Pair matte black hardware on lighting and shelving with warm natural oak wood accents, or combine brushed brass fixtures with soft ivory and blush textiles for a refined aesthetic. Incorporate multi-textured fabrics—such as chunky knit throw blankets, ribbed velvet cushions, and woven jute floor rugs—to add warmth and depth to minimalist furniture foundations, creating a welcoming atmosphere for both study and relaxation.
Budget or Time Planning
Executing a stylish teen room makeover is an economical and time-efficient home improvement project when planned in structured phases. Rather than buying expensive matching bedroom sets, families can achieve a custom, high-end look by combining affordable modular furniture from flat-pack retailers with simple DIY enhancements like painted geometric accents, thrifted vintage mirrors, and self-installed LED light strips. Completing the project over a single three-day weekend—allocating day one to purging and painting, day two to furniture assembly, and day three to lighting and styling—ensures steady progress without overwhelming household routines.
| Project Phase | Implementation Window | Estimated Budget Window | Primary Materials Included |
|---|---|---|---|
| Purging & Accent Painting | 4 – 6 Hours | $40 – $90 | Painter tape, interior latex paint, rollers |
| Modular Furniture Setup | 5 – 8 Hours | $250 – $650 | Loft or platform bed, desk, cube organizer |
| Wall Fixtures & Lighting | 3 – 5 Hours | $60 – $140 | LED neon rope, pegboard, picture ledges |
| Textiles & Soft Staging | 2 – 3 Hours | $80 – $200 | Bedding set, floor cushions, rugs, planters |
From an ongoing maintenance perspective, implementing a weekly ten-minute room reset habit helps teenagers keep their personal space organized. Returning gaming controllers to wall pegboards, storing books in desk cubbies, and clearing desktop surfaces prevents clutter from accumulating over time. By investing a modest weekend budget and establishing structured storage systems, you can create an adaptable, inspiring teen bedroom that supports academic success and personal relaxation for years to come.
Creative Expansion and Advanced Inspiration
Once the foundational bedroom layout is complete, exploring advanced smart-home integrations and creative customization offers exciting avenues for personalizing the space. Consider installing smart plug adapters and voice-controlled lighting hubs that allow teenagers to automate room lighting scenes—such as triggering a gentle sunrise lighting sequence in the morning or activating a focused study mode with a single voice command. Integrating smart technology makes the space highly functional while teaching teenagers practical home automation skills.
Key Takeaway: Combining adaptable vertical storage, dedicated functional zoning, and multi-layered smart lighting transforms basic bedrooms into dynamic, inspiring sanctuaries tailored to teen lifestyles.
Another creative avenue is converting a closet interior into a hidden mini recording studio or podcast nook by lining the interior walls with acoustic foam panels and installing a floating microphone boom arm. You can also build an interactive chalkboard or magnetic dry-erase calendar wall using specialty wall paint, providing a dedicated space for tracking school project deadlines, daily schedules, and creative sketches. These advanced adaptations ensure your teen room design remains a dynamic, versatile sanctuary that evolves alongside emerging talents, academic milestones, and creative passions.