It started with a kitchen drawer. You know the one — the drawer where bottle caps go to be forgotten, because the recycling truck won’t take them loose…
It started with a kitchen drawer. You know the one — the drawer where bottle caps go to be forgotten, because the recycling truck won’t take them loose and throwing them in the bin feels wrong. I had about sixty in there, all colours, and one quiet afternoon I tipped them onto the table and just looked at them. Same size, more or less. Sturdy. Honestly quite beautiful, in a leftover sort of way.
So instead of a drawer, they became projects. Ten of them, over a few months. Some turned out better than others — one of these took me two tries and a small burn on my thumb — but every single one used something that was headed for landfill. Here’s what I made, in the order I made it, with the honest notes included.
1. A pixel picture, one cap at a time
The red corner was a mistake I decided to love.
This was the first one, and still my favourite. You glue caps onto a piece of plywood in a tight grid, and from across the room the circles blur into a simple geometric pattern — a diamond, a stripe, whatever your patience allows. Mine is mostly white, grey and black, with one red corner that happened because I ran out of black caps and refused to buy drinks just for lids.
Plan it on paper first. Honestly, do. I skipped the sketch and my diamond drifted two caps off-centre, which you can see if you stand in exactly the wrong spot in my hallway. Use a strong construction adhesive or two-part epoxy, one dot per cap, and let the whole board cure flat for a full day before hanging. A board of about 24 by 36 inches swallowed roughly 200 caps, so start saving early — or do what I did and ask the neighbours.
2. Coasters and a trivet, fused in the oven
First batch came out wavy. The skillet fixed that.
This is the one that burned my thumb, so respect the oven mitts. You arrange clean caps close together on parchment paper, cover them, weigh them down with a heavy flat pan, and bake at around 320°F until the edges soften and melt into each other. What comes out is a single flat disc — waterproof, wipeable, and tough enough for a hot kettle.
Only use caps marked HDPE (the number 2 recycling symbol), because they soften at the same temperature. Mixed plastics give you a lumpy mess; I know this from batch one. Keep the window open, because warm plastic has a smell you don’t want in your kitchen all evening. Press the disc flat while it cools — a cast-iron skillet works beautifully — and sand the rim smooth afterwards. My second set sits under the coffee pot every morning and still looks new.
3. A table runner that bends like chainmail
150 caps in. My pliers hand needed a rest day.
Drill four small holes around the rim of each cap, then join the caps with little metal jump rings — and slowly, a stiff pile of plastic turns into something that drapes. It moves like chainmail. It sounds like chainmail too, a soft clicking when you lift it.
You’ll need around 150 caps of the same size, two jewellery pliers, and more patience than you think. A wooden jig — just a scrap block with a notch — holds each cap steady while you drill, and saves the holes wandering. I worked in strips of ten caps and joined the strips together at the end, which kept the counting sane. Keep your colour palette tight; mine is grey, olive and bone white, and because the grid is open, the wood of the table shows through underneath. It lives on the balcony table now. Rain doesn’t touch it. Spilled juice wipes straight off.
4. A mobile that turns on its own
It spins whenever the window’s open. Still makes me look up.
I made this for my niece’s room, and it’s the project visitors always ask about. Drill one tiny hole through the centre of each cap, thread them onto clear fishing line in back-to-back pairs — that way you never see the hollow inside — and hang five or six strands from two crossed birch dowels.
The fiddly part is balance. Tie the strands on loosely first, hang the whole thing from one finger, and slide the attachment points along the dowels until it sits level. A tiny glass bead knotted at the bottom of each strand stops the caps sliding off and adds a little weight, which helps it turn slowly in the air from the window instead of just hanging there. Bright colours work best here; this is the one place I let the palette run wild. Total cost: the dowels. Everything else was already in the house.
5. A planter basket held together with zip ties
Two summers outside and the colours haven’t faded.
Plain plastic flowerpots are ugly and I own many. This basket hides them. You punch four holes in the sides of each cap, link the caps into rings with small UV-resistant zip ties, then stack five rings and tie the tiers together. The result is a stiff, open cylinder that slips over a nursery pot, and water drains straight through the gaps.
About eighty caps does one medium pot. Trim the zip-tie ends flush, right against the knot — I skipped that on the first ring and scratched my wrist every time I moved the plant for a month. Use caps of one size only, or the cylinder leans like a tired cake. Mine has sat outside through two summers now, rain and full sun, and the plastic genuinely doesn’t care. The terracotta pot inside might crack one winter. The basket won’t.
6. A wall clock with caps for the hours
Twelve navy caps. Telling the time is weirdly satisfying.
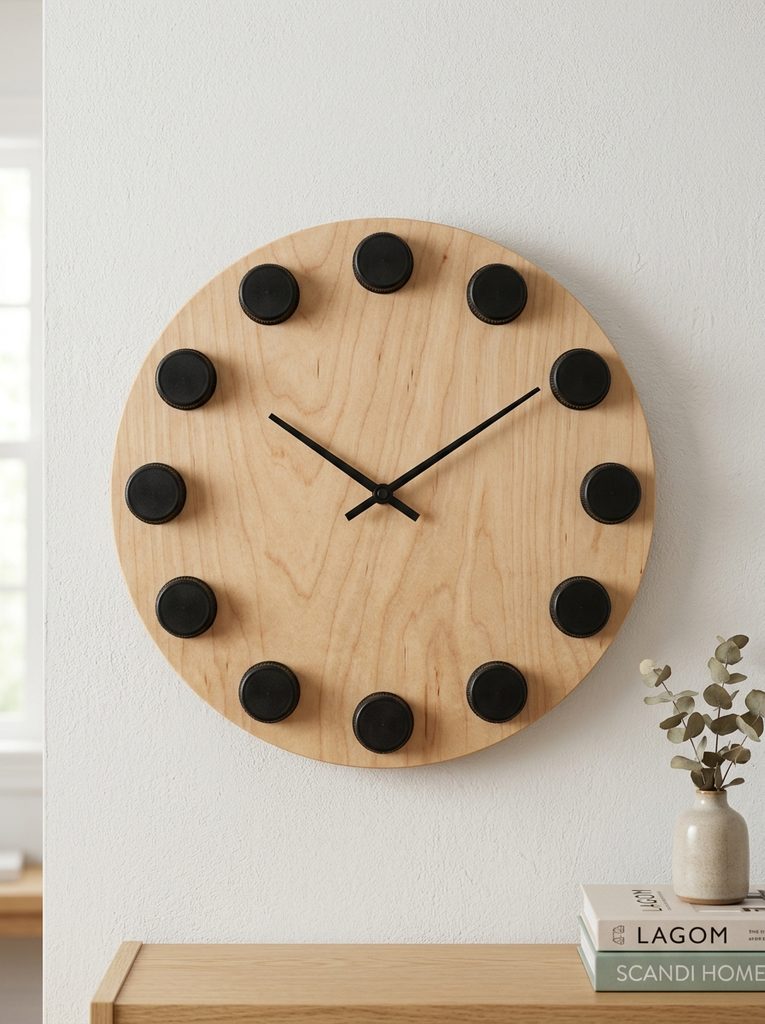
A plain wooden disc, a silent clock mechanism from the craft shop, and twelve matching caps glued at the hour positions. That’s the whole project, and it looks far more deliberate than it is. The little ridges on the caps catch the light, so the markers have a shadow and a presence that painted dots never would.
Measure the twelve positions with a protractor — thirty degrees apart, marked lightly in pencil before any glue comes out. I eyeballed my first attempt and 4 o’clock ended up noticeably closer to 5, which annoyed me every single day until I redid it. Twelve caps in one colour, matte navy in my case, reads calm and Scandinavian; a rainbow spectrum version would suit a kid’s room better. Silicone adhesive holds them fine. Total build time was under an hour, not counting the redo. Learn from my redo.
7. Drawer trays for all the tiny things
Screws, pins, one mysterious key. All visible, all sorted.
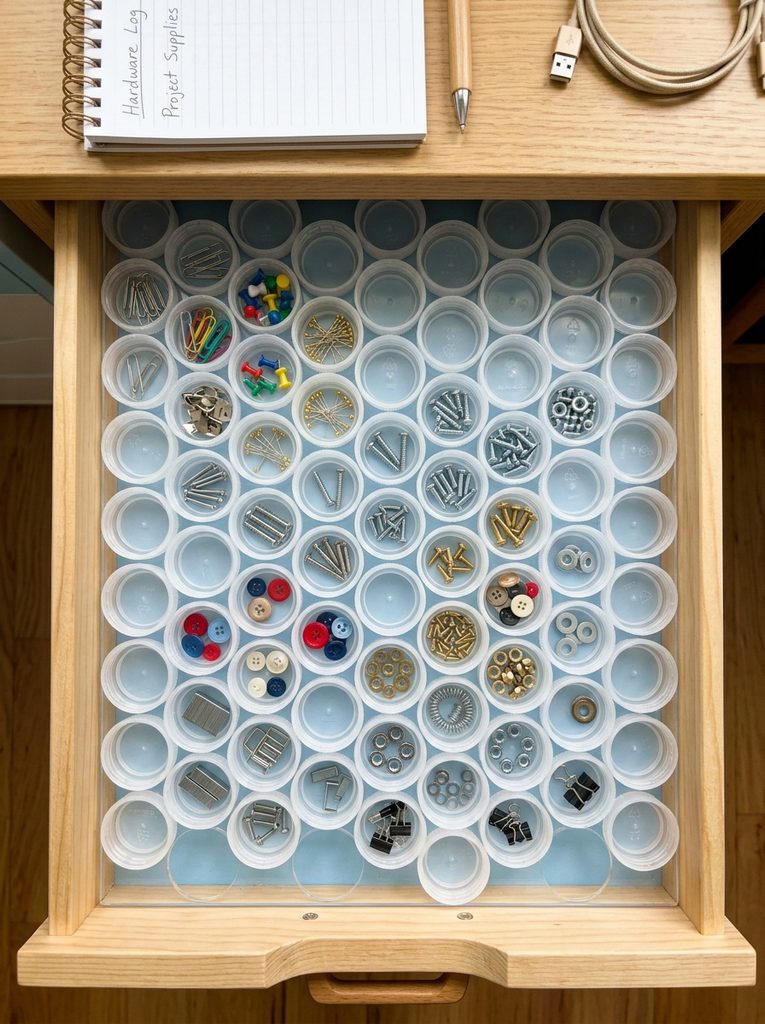
The least glamorous project here and the one I use most. Glue wide caps — the big ones from milk and juice bottles — in tight rows onto a board cut to fit your drawer, open side up. Each cap becomes a little cup for screws, pins, buttons, batteries, all the small hardware that otherwise migrates to the drawer’s darkest corner.
Measure your drawer before you cut the board, not after. Voice of experience. Cardboard works, thin acrylic is better if the drawer gets heavy use. A dot of hot glue under each cap is plenty, because nothing here bears any weight. I staggered the rows like bricks so more caps fit, and I kept one row empty on purpose — there’s always one odd object that needs a home, and future you will be grateful. Fifteen minutes of gluing, and my desk drawer has stayed tidy for a year. A year.
8. Stepping stones with a cap pattern
The blue ones glow a bit after rain. My favourite path in the garden.
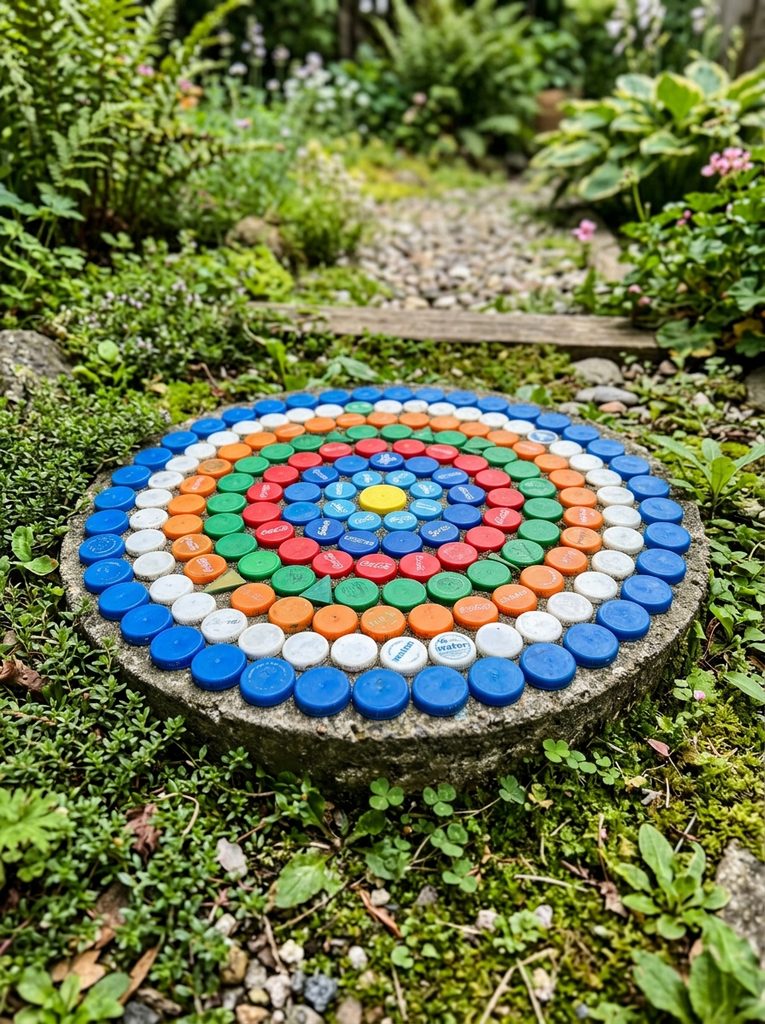
You press colourful caps, face down, into the bottom of a round mould, pour concrete over them, and when the stone comes out the caps sit flush in the surface like a rough terrazzo. The ridged edges also give the stone a bit of grip underfoot, which matters on a wet garden path.
Grease the mould well — petroleum jelly or cooking spray — or you’ll be chiselling your artwork out in pieces. Ask me how I know. Mix the concrete to thick-porridge consistency, pour slowly, and tap the sides of the mould with a mallet to pop the air bubbles. Then leave it alone for two full days in the shade; impatience cracks concrete. I made four stones for the path to the herb bed, each with a different colour family. They’re heavy, they’re not perfect, and they are completely mine. That counts for a lot in a garden.
9. Stamps with cap handles
The wonky triangle is everyone’s favourite. Mine too, now.
Cut a simple shape from craft foam — a leaf, a triangle, a crescent — glue it to the flat top of a cap, and you have a stamp with a genuinely good handle. The ridged sides give small hands something to grip, so this is the project I’d hand to kids first, before anything involving ovens or drills.
Keep the shapes bold and simple. My first leaf had delicate little veins that filled with ink and printed as a blob; the plain triangle I cut as an afterthought prints perfectly every time. Brush fabric paint on thinly rather than pressing into a soggy ink pad — too much paint is the difference between a crisp print and a splodge. We’ve stamped wrapping paper, a tote bag, and about forty cards with the same twelve caps. When a foam shape wears out, peel it off and glue on a new one. The handles are immortal.
10. A mirror framed in rings of caps
Guests think it’s ceramic. I let them think it a moment.
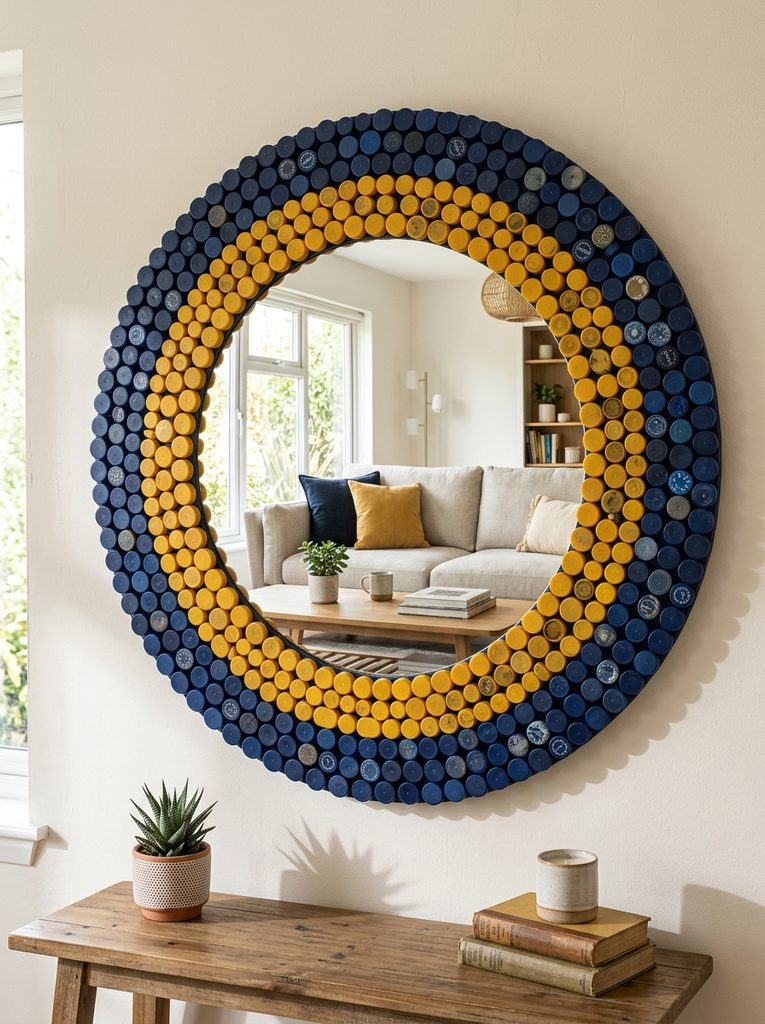
The biggest piece of the ten, and the one that hangs in my hallway. Glue a round craft mirror onto a slightly larger MDF disc, then build two rings of caps around it — big caps tight against the mirror’s edge, smaller ones overlapping outside them. The layered circles catch the light like scales, or petals, depending on your colours.
Use two cap sizes and no more than two colours, or it tips from striking into noisy. I went cream and soft blue. Construction adhesive, not hot glue — this thing is heavier than it looks, and it hangs above head height, so respect gravity. Let it cure a full twelve hours before hanging, and use a proper picture cord, not string. Sixty to eighty caps sounds like a lot until you remember the kitchen drawer. It took one long evening, a podcast, and most of a tube of adhesive. Worth every cap.
If you’re starting from zero
Start with the stamps or the drawer tray. Both take under an hour, need no oven and no drill, and they’ll teach you the only two skills that really matter here: getting caps properly clean, and which glue holds on slick plastic. Wash everything in warm water with dish soap and a splash of baking soda, scrub the threads, and dry them fully — most failed cap projects I’ve seen (including two of mine) failed at the sink, not the workbench. On a budget, skip buying anything until you’ve done one small project with what’s in the house. Save caps by colour from the start, in jars, not a drawer. Your future self, mid-mosaic, will thank you.
Questions I get asked
Do the caps need special cleaning?
Just thorough cleaning. Warm soapy water, a stiff little brush inside the threads, and complete drying before glue touches them. Sugary residue is the enemy of every adhesive.
Which glue actually holds on plastic?
For anything outdoors or load-bearing: two-part epoxy, silicone, or exterior construction adhesive. Hot glue is fine for the drawer tray and stamps, but sun and frost will pull it apart outside.
Is melting caps in the oven safe?
Use only HDPE caps (number 2), keep the temperature around 320°F, ventilate the room well, and ideally use a dedicated toaster oven. Don’t walk away from it. And wear the mitts — signed, my thumb.
Where do I get enough caps?
Ask. Cafés, offices, neighbours, the gym. People are delighted to hand over a bag of caps once they hear why. I have never once had to buy a drink for its lid. Well. Once.
Can kids join in?
Yes — sorting, washing, stamping and the mobile are all kid-friendly. Keep the drilling, oven work and concrete mixing for the adults.
That’s the drawer emptied, more or less. If you try one of these, I’d love to hear how it went — especially the failures, which are always the better stories. Save this to your craft board on Pinterest if your own cap drawer is starting to overflow.